
Users and Roles
The users and roles component allows you to manage and administrate your users and roles in your system, and/or create new users and roles, which again grants access to invoking endpoints for your end users. This component is what allows you to control how others are accessing your system. You might for instance have 3 different roles in your company, being c-level executives, managers and employers. Typically these 3 different roles should not have access to do the same things, so you want to associate users belonging to these different roles to different roles in Magic.
Magic’s authentication and authorisation internals
Magic is built upon JWT authentication and authorisation. This is a commonly used web standard, and allows you to easily use its existing authentication and authorisation system in your own code. JWT implies JSON Web Token, and is typically transmitted from your frontend to your backend as a “Bearer” token in your “Authorization” HTTP header.
Each user again belongs to one or more roles, and you assign access rights to parts of your system by declaring what access a role has. This is referred to as RBAC security, and implies Role Based Access Control. This makes it easy for you to see what access rights an individual user has by seeing what role(s) the user belongs to.
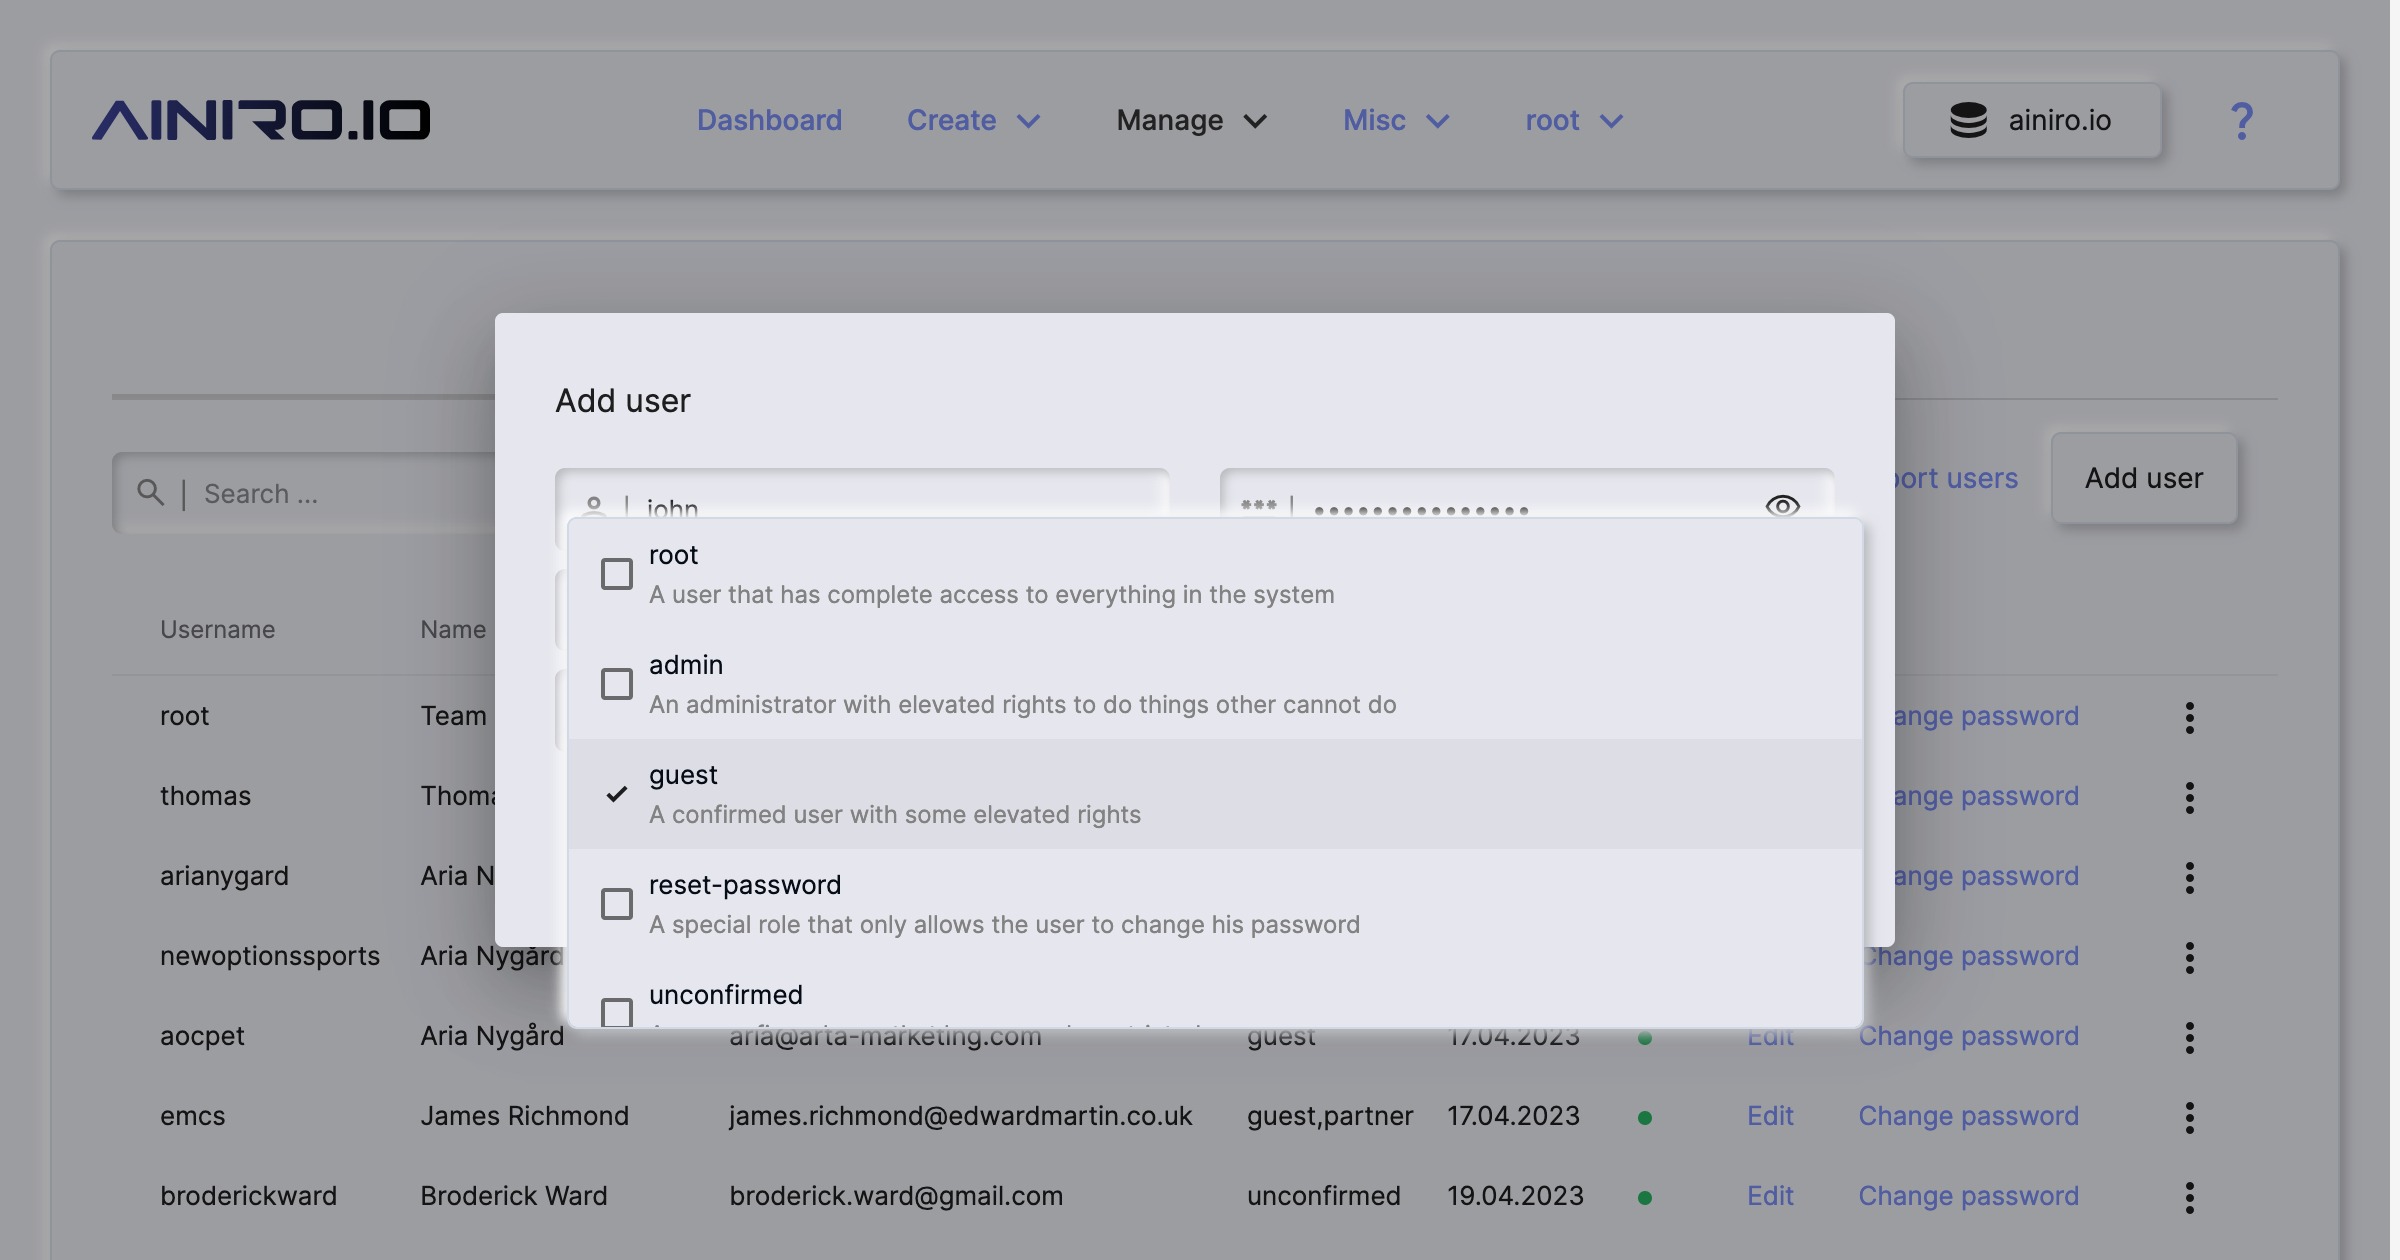
Managing users and roles
The users component is divided up into two parts. One part allows you to manage your users, and the other part allows you to manage your roles. You can create as many roles and users as you wish, and the component also contains basic support for importing users from files you might have that’s declaring your users. This allows you to easily move your existing users from other systems, into Magic’s RBAC system, and use Magic as your single sign on component within your enterprise.
Users again have extra fields, which can be any information you wish - However, byt default Magic will only handle email and name, allowing you to associate a name and an email address with users you create in your cloudlet.
Users and roles internals
All access in Magic is based upon roles, implying all users belonging to the same role(s) have access to the same parts of your backend. This makes it easier to provide access to specific parts of your system(s), and/or also see which parts of your system specific users have access to. This is referred to as RBAC or Role Based Access Control. To create a new role choose “Role management” and click the plus button in the top/right corner of the component.
Magic does not create “access rights” associations for roles. Instead the system allows individual endpoints to declare themselves which roles are allowed to invoke the endpoint. This is often referred to as “Inversion of Control” or IoC. This is done by invoking [auth.ticket.verify] from your Hyperlambda code, and pass in a comma separated list of roles that are allowed to invoke the endpoint.
// Some Hyperlambda endpoint file.
auth.ticket.verify:root, admin
Consuming the auth component in your own frontend
The authentication and authorisation system in Magic is very flexible, and allows you to consume it from your own frontend code. To consume the auth module in Magic requires understanding how to use the endpoints related to this, and how the flow of user registration and user authentication works. This allows you to use Aista Magic Cloud as a single sign on component for your own enterprise, having a single source of truth related to authentication and authorisation.
Endpoints related to authentication and user registrations
Magic contains a whole range of HTTP endpoints you can take advantage of in your own frontends to solve registration, authentication, and related problems. Some of the more important endpoints related to this are as follows.
- POST - magic/system/auth/register - Allows users to register in your backend
- POST - magic/system/auth/verify-email - Allow users to verify their email address
- GET - magic/system/auth/authenticate - Allow users to authenticate
- GET - magic/system/auth/verify-ticket - Verifies validity of a JWT token
- GET - magic/system/auth/refresh-ticket - Refresh JWT token endpoint, returning a “fresh” JWT token
- GET - magic/system/auth/endpoints - Returns authorisation requirements associated with all endpoints
- PUT - magic/system/auth/change-password - Allows a user to change his or her password
- POST - magic/system/auth/send-reset-password-link - Sends a reset password email to a registered user
The above should cover most needs related to creating simple registration forms, allowing others to register in your Magic backend.
User registration in Magic
Assuming you’ve configured Magic’s SMTP settings, registering a user results in a two phase commit workflow, where the user is supposed to provide his or her email address, a username, and a password, resulting in a “confirm email address” email being sent to the user, allowing the user to confirm the email address supplied during registration. Only when the user has confirmed the email address supplied, the user will have a fully functional user in Magic. There are two important endpoints related to this workflow, and these are as follows.
- POST - magic/system/auth/register - Allows users to register in your backend
- POST - magic/system/auth/verify-email - Allow users to verify their email address
The first endpoint above allows a user to register at your site, and if you have configured your SMTP server correctly, it will create a “double optin” workflow, where the user needs to verify his or her email address before given access to the site. The “register” endpoint requires the following payload.
{
  "username": "janedoe",
  "password": "some-password",
  "frontendUrl": "https://your-frontend-url.com",
  "template": "/some/path/to-some-email-template.html",
  "subject": "Subject line of registration email",
  "extra": {
    "name": "John Doe",
    "email": "john@doe.com"
  }
}
The most important argument is the [username] and [email] obviously. Usernames must be unique, implying the username cannot have been used previously to register towards the same backend, and the email which is actually optionally, and an “extra” field associated with the user is used for sending the user his or her double optin email. The [frontendUrl] argument allows you to provide the registration endpoint with a URL where you later extract query parameters automatically created by the registration process and sent to the user as a hyperlink he or she must click to verify their email address. The [template] is a HTML file somewhere in your backend that the registration welcome email is automatically generated from, and the [subject] is the subject line of this welcome email. Both the [template] and the [subject] arguments are optional, and default values will be used if they are not supplied. The [extra] field is additional extra information associated with the user and Magic can be configured to allow for any additional extra information you need to be associated with registered users. By default only “name” and “email” is allowed as extra information. Unless the user provides an “email” value, no email will be sent to the user, and the user has to be manually verified by a root user in the system. If you want to enforce double optins you’ll have to add logic in your frontend to enforce a valid email address as users are registering.
As the user registers he or she is associated with the “unconfirmed” role. This is the most restricted role in the system, and doesn’t allow the user to do anything, except of course verifying his or her email address. When the user registers a welcome email is created and sent to the user’s email address. This welcome email will ask the user to verify his or her email address by clicking a link in the email. This link will resemble the following.
https://your-frontend-url.com?
token=e3b0c44298fc1c149afbf4c8996fb92427ae41e4649b934ca495991b7852b855&
username=john@doe.com&
url=https://your-backend-url.com
The token is a security token created to uniquely identify the email address, ensuring nobody but
the recipient of the welcome email is able to verify the email address. If you create your own
frontend allowing for registrations in your Magic backend, you have to extract this token and the
username, and pass both into the POST “magic/system/auth/verify-email” endpoint. Implying
you would create an HTTP POST invocations towards the verify-email endpoint resembling the
following.
{
  "username": "john@doe.com",
  "token": "e3b0c44298fc1c149afbf4c8996fb92427ae41e4649b934ca495991b7852b855"
}
When you have passed the above payload into your verify-email endpoint, the user will be de-associated
with the “unconfirmed” role and associated with the “guest” role - In addition to that a valid JWT
token will be returned that you can associate with the user, implying the user is already logged in towards
your backend. This “guest” role gives the user
slightly more access in your backend, but is still a highly restricted role, and does not
give the user access to any of your system endpoints allowing him to tamper with your
backend in any ways. If you want to grant the user additional access in your backend, you’ll
have to manually add him or her to additional roles through the Magic dashboard’s “Users & roles” menu
item. When the above workflow is completely done executing, the user has registered, and verified
his or her email address, the user can login to the system as a “guest” account. Below you can
see two such registered users; One having not yet confirmed his or her email address, and the
other having confirmed his or her email address.
Changing passwords and implementing “forgot password” in Magic
Sometimes users forgets their passwords, and need to have the system send them a “reset password” type of email. For those cases Magic contains the following endpoint.
- POST - magic/system/auth/send-reset-password-link
Notice - This endpoint also obviously assumes you’ve already configured your Magic backend to have access to some email/SMTP server. This endpoint works more or less the same as the above “register” endpoint, and requires the following payload.
{
  "username": "username",
  "frontendUrl": "https://your-frontend-url.com",
  "template": "/some/path/to-some-email-template.html",
  "subject": "Subject line of forgot password email"
}
Notice that the URL constructed towards your frontend for a “forgot password” email
and a “register email” is the same in structure, except the “forgot password” email will
construct a URL with its token query parameter being a real JWT token, while the register
email will send a simple hash. The way to separate these two different links is to check
in your frontend code if the token query parameter contains a . or not, and if it does,
you can assume it’s a valid JWT token, and use it to allow the user to invoke the change-password
endpoint. If the token query parameter does not contain a . it should be assumed to be
a registration token type, and you need to pass it into your verify-email endpoint instead.
If you use different URLs for registrations and forgot password logic this doesn’t
really matter. Below is an example of a URL created as the user forgets his or her password.
https://your-frontend-url.com?
token=eyJhbGciOiJIUzI1NiIsInR5cCI6IkpXVCJ9.
eyJuYW1lIjoiZm9vMDVAc2VydmVyZ2FyZGVucy5jb20iLCJyb2xlIjpbInJ
lc2V0LXBhc3N3b3JkIiwiMGQ5MTAzMDJjYjIyMjc5YzE2OGIwNmE3YTM5NT
JiMDc2NDQwMWZhZGMyNjI1YjhiZDAxYjViMjcxYmU3ZjU2OSJdLCJuYmYiO
jE2NDM4MDYzMDgsImV4cCI6MTY0MzgxMzUwOCwiaWF0IjoxNjQzODA2MzA4fQ.
9xz3txhNX_z13_j7zksgnp0VpVZAxVXkySw3ZFtIync
username=john@doe.com&
url=https://your-backend-url.com
Notice the . parts separating it from a “welcome as registered user” email. When you have extracted the
above token you need to invoke the following endpoint to actually allow the user to change his or her
password.
- PUT - magic/system/auth/change-password
The payload to the endpoint should be as follows.
{
  "password": "new-password"
}
At this point you can ask the user for a new password, and use the JWT token found in the query perameters of your URL as the Authorization “Bearer” token associated with the request. Once you’ve invoked the above endpoint, you’ll need to allow the user to login again to get a “real” JWT token, that the user can use for other things besides only changing his or her password. You can use the same endpoint if you want to allow users to simply change their passwords using a normal flow, without any “forgot password” parts.
Authenticating users
To authenticate a user you can use the following endpoint.
- GET - magic/system/auth/authenticate - Allow users to authenticate
The endpoint requires two argument.
- [username] - The username, or email typically if it’s a registered user
- [password] - The user’s password
The endpoints returns a JWT token if successful, which you can use in consecutive HTTP requests towards the backend to authorise the user. Below is an example of the response from the endpoint if succesful.
{
   "ticket":"eyJhbGciOiJIUzxyz.eyJuYxyx.jWNVFWxyz",
   "extra": {
     "name": "John Doe"
   }
}
When you want to use the JWT token you have to attach it to your consecutive HTTP requests as a “Bearer” token
in the Authorization HTTP header. Only the value of the above ticket field is your actual
token. The above “extra” field is additional extra information associated with the user during registration,
and depends upon what information the user provided as he registered, and/or how you’ve configured Magic
to accept additional extra information.